a welcome back

A funny thing about blogging – one meets other bloggers and after a while many feel like they are good friends even if we never meet. When one of them quits blogging it’s like losing a friend. This happened to me and to her numerous fans, when Amy Kane shut down ever so humble last fall.

Well, I’m so excited to find Amy is back at a new blog Atlantic Ave**. If you were a reader of her blog before and miss her, go visit her again and say “welcome back”! (Or am I the last to know?) But, if Amy is new to you, I recommend a visit as I think you will enjoy her snippets of life in New Hampshire as she shares “news, photos and observations about a small place called home.”

** later, later, I find this blog site has also expired. Links removed.
Japanese woodblock printing

printing&cutting.jpg
A few days ago, Tae-Huk Kim, our artist-in-residence from Korea, gave us an excellent demonstration of traditional Japanese woodblock printing. This is the technique he uses for making his contemporary woodcuts.

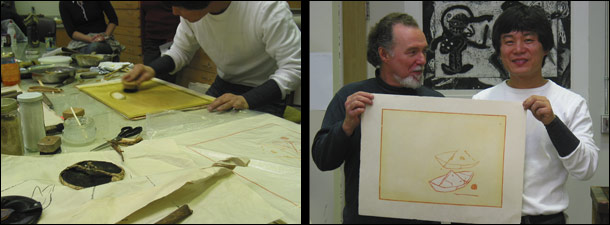
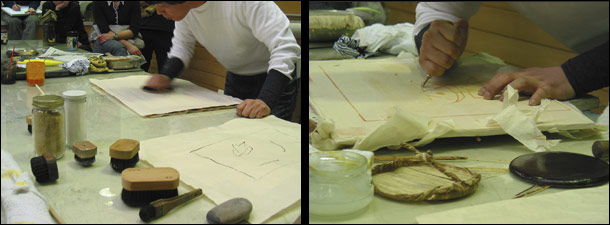
Several woodblocks are made, usually one for each colour, so registration of all these is critical. Kim begins with the first block that has been cut with the desired image plus the registration marks in two locations. He wets this block with a wide brush and water, then squeezes watercolour from a tube (any kind is fine) and some wheat paste, and brushes these around and up the cut relief areas. You can see his brushes in the left photo above, and also how the paper has been laid over the inked block, and Kim is rubbing the back vigorously with a baren (the round disks in the right photo above). Thus he makes a print.

Now he takes a clean uncut woodblock, wets it, applies Japanese glue over it evenly and places the print on top. This he allows to dry for about 15 minutes, then rubs the paper off, leaving behind the printed image. This becomes a cutting guide for the next colour area and is repeated for consecutive colour blocks.

The cutting tool that Kim favors most of the time is a traditional Japanese blade with a wood handle – note in the right photo above how he holds this with his fist at an angle, pulling towards him as he cuts along the edge of both sides of a line. Some western style woodcutting tools with curved blades have been taken into use now primarily for cutting away the open areas that will not be printed, and these are pushed into the wood. Kim also demonstrates how the tools are sharpened using Japanese water stones.

woodcut&barens.jpg

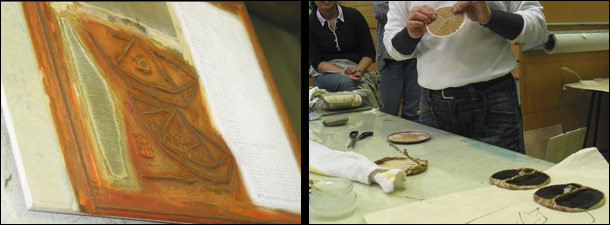
The left photo above shows one of the cut blocks. The raised or relief areas are what will be inked and printed. The white area on the right is a cut grid pattern inked white, while the center area and a border line are inked orange. On the left is a relief area that is left uninked as support for the paper. The registration marks are somewhere along one edge but can’t be seen in this photo.

The Japanese baren that is used for printing is a fascinating tool, consisting of up to 52 layers of lacquered Japanese paper on the outer disk. The inner disk, which Kim is holding in the right photo above, is made of tight rings of fine bamboo rope. The outer working surface is made of bamboo skin that is wrapped and tied to the disks, and is replaced as it wears out – an interesting demonstration of this too! It is time consuming to make the entire baren and costs about $500 each to buy! Kim says he sometimes makes them himself when time allows.

inking&thePrint.jpg

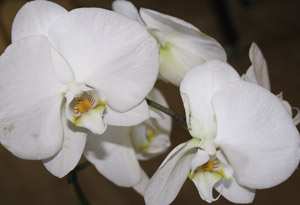
The second colour woodblock, once cut, is soaked with water and animal glue for a while. Then yellow watercolour and wheat paste is applied and brushed (see photo above left). This is printed over the first orange and white print, using the baren. There’s the two colour print in the right photo held up by Kim on the right and Wayne Eastcott, printmaking faculty, on the left.

Kim usually uses Japanese Kozo paper which he dampens and leaves in a plastic bag overnight before printing as well as between each colour printing.

I asked Kim if this method is the same as that used in making the famous Ukiyo-e Japanese woodblock prints produced between the 17th and the 19th century. Kim said it is very close but with the addition of some modern day tools, and adapted to his contemporary images.

Thank you, Kim, for this excellent presentation! I kept thinking about how easy this method of printmaking would be in a small home studio – no printing press and no toxic materials!

I’ve given fairly basic and minimal information here, so if you are interested in more information, check out the numerous links in Wikipedia’s article on Japanese woodblock prints, including an online demonstration, as well as the Handbook of Japanese Printmaking Technique.

Oh, and don’t forget Kim’s exhibition opening tonight if you are in the area!

Valentines

orchid.jpg

Happy Valentine’s Day to all my readers! If you are in Finland, I wish you Hauskaa Ystävänpäivää! (That means Happy Friends’ Day, which I just learned about and like very much!)

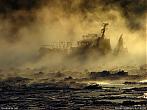
Because my birthday is so close to Valentine’s, we celebrate the two at once. Instead of red roses, I received a beautiful white phalaenopsis orchid to add to my growing collection! My husband loves giving me these because they last such a long time and I love them (and him!) too.

Mirabilis has a couple of out-of-the-ordinary stories about this day:
Ancient Rome waited until March 1st
Valentines from ancient Rome.

Later: Don’t you just love this photo from National Geographic ?!

060214_animal_love.jpg

photos of Finland

phpThumb.jpg
Niklas Sjöblom photo, February 6, 2006

I have a few longer blog posts that I have been wanting to write for some time but have been busy and then too tired to organize my thoughts and research. So, instead I’ll be lazy and point to a couple of interesting photography links that I think you will enjoy.

Niklas Sjöblom’s photoblog Under the Open Sky has won acclaim for the stunningly beautiful, almost daily photos taken of the changing seasons, usually around Helsinki.

The second site is presently featured on Virtual Finland’s* front page, and is a hauntingly beautiful slide show of Icebreakers in the Baltic Sea.

*Virtual Finland has been replaced by ‘This is Finland’ but most links will not transfer though we are lucky the above one does.

Bill Laing’s Silkscreens

BLaingTerrainofDomestic.jpg
Bill Laing – “Terrain of the Domestic Landscape #2” – Silkscreen

Yesterday we spent a few enjoyable hours poking around the always lively Granville Island. Amongst other pleasures, we stopped in to view Bill Laing’s exhibition PARIS: Recent Silkscreen Prints at Malaspina Printmakers Gallery.

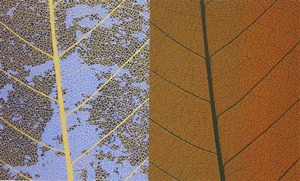
Magnified patterns from nature; leaf vein patterns, ripples on the surface of water and patterns that mirror nature; floral lace patterns, leaf motifs on drapery form the source of inspiration for Bill Laing’s recent silkscreen prints.

These patterns usually obscure hidden human figures that you would not know were there until stepping back farther – an interesting visual play. I was pleased to see a body of his work together, having only seen one or two in real life before. Bill Laing is a well-known Canadian printmaker, a professor and head of printmaking at the University of Calgary, Alberta.

It’s well worth visiting this exhibition if you are in the area, and it is still up until February 19th. You can read more about Bill Laing and see some of his works at the Herringer Kiss Gallery site.

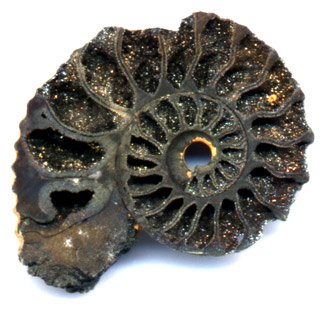
spiral

amonit.jpg

Hope you enjoy this, another of my scans, including these flowers.

Meanwhile I am looking forward to a busy happy day tomorrow celebrating my birthday.

printers and scanners

In the comments to yesterday’s post about my experiments, virtual friend and artist-blogger in Alaska, Elise Tomlinson asked some very interesting questions, which have inspired me to write today’s entry.

So, do you have your own printer and scanner for doing giclees? I am so intrigued with the whole process of them. Right now I get them done by a local print shop, they are reproductions of paintings I’ve done…but I’ve heard of other artists with their own printers/scanners who use the new technology to produce what I would consider to be original fine art prints (using your definition) conceived of originally as a print, where they control the amount of ink, the paper, etc. What are your thoughts on that? Also, if you do have your own equipment, would you mind sharing what brands you own?

I first wrote nearly two years ago about the tools that I use and later about the studio where I make my prints – you might start reading these first for a background.

At home I still use my old (1997) Umax Astra 1200S scanner though it’s SCSI and has to be connnected to an old Mac G3 which I can access at my Mac G5 via the network. It’s slow and a bit inconvenient but I haven’t wanted to spend the money on a new one with a fast Firewire connection because I do like its 8.5 by 14 inch bed.

When I need to do some high resolution scans for my large printworks, I use the studio’s scanner, an Epson Professional (I’ll check the precise model tomorrow), which allows slide and film scanning too. (It’s 1680.)

I still use my HP Deskjet 1220C 13″ printer at home, one I chose because the studio has one, as does the technician herself in her home studio, and it’s proven to be a real workhorse. It uses water-based dye ink, which is not fully archival ie. more than 80 years, though still very good. I use it for small projects and proofing my work in a smaller scale before printing at the studio’s 42″ HP 5000UV which is fully archival with waterproof UV pigment inks. The experiments that I wrote about yesterday were done with this studio printer.

It is a high end professional machine that has been very durable, reliable and gives excellent results. It’s just that some artists like yours truly are pushing the medium further and expecting it to do more than it was designed for!! Newer models offer more features of course. One of the Institute members recently bought himself an Epson 7800 (I think) that is 24″ wide, with adjustable heads to allow thicker materials and with a straight feed for rigid surfaces. So for my problem with the organza, his printer might work better!

And my thoughts on giclee printing? Please read prints vs reproductions.

experiments

testdetail2A.jpg

As some readers know, my most recent printworks have been utilizing an inkjet printed clear mylar layer over a print on paper. I’ve expressed some dissatisfaction with the mylar’s shine and reflection. So, I’ve been looking into alternative materials for new work in the same series, and found some sheer polyester organza which I’ve been experimenting with. The fabric is very light and hard to cut square and obviously had to be attached to some support in order to feed it through the wide-format printer. I’ve done several tests:

1. I sprayed repositionable adhesive on fairly sturdy paper. Unfortunately the can was old and the glue sputtered on unevenly. It was difficult to get the sheer cloth on evenly and I got a lot of glue on my fingers. (Use gloves next time!) At the printer, I had a bit of difficulty feeding it in as it has to wrap around the feeding roll, but it did print! RESULT: Most of the ink passed through to the backing paper. Glue bits were stuck on the organza even after lifting it off the paper.

2. A fellow artist offered his poly-coated freezer paper to try out. I ironed the organza to this. To assure the edges stayed stuck I used painters’ green tape over the edges of the organza, gradated to the edge of the freezer paper. This went through the press quite well. RESULT: Like #1, more ink ended up on the backing, but because the coating is non-absorbent the ink pooled in some areas, so I let the ink dry before peeling the fabric off. The printed freezer paper looks pretty interesting, and the blotchy spots did remain on the fabric though faintly.

3. I tried to repeat #2 but this time the paper jammed in the printer heads, because it curls upwards! We do not want to damage the printer-heads!

4. This time I took the freezer paper/organza and taped it to a lightweight art paper. The printer heads did drag over some of the tape.

5. Repeated # 4 using thin transparent tape. This caught on the printer heads too!

CONCLUSION: The freezer paper coating is not strong enough to hold down the cloth against the handling over the feed roller and the vacuum, hence causing the fabric to lift at the tape edges and catch in the printer heads. Goodbye to this technique.

NEXT TESTS: Back to #1 with a fresh new can of repositionable adhesive and using a lighter paper backing. In addition, inkjet vellum is now on order and we’ll see how that works.

I really have to think some more about how to successfully incorporate the image on the organza because it is rather faint. I’ve also been wondering if the polyester fibre is the right choice, silk likely would have been preferable but the store did not have this. I’ve even had a bit of a “chat” with Omega, a new virtual friend and fabric-artist blogger of the fascinating Threading thoughts, who has confirmed this in her own practice.

The above image is an interesting detail of one of the test prints left behind on the freezer paper. (Someone pointed out that this is an inkjet silkscreen print!)

ADDENDUM March 2nd, 2006: Continued in experiments, part 2

Tae-Huk Kim exhibition

KimTae-HukInvitation.jpg

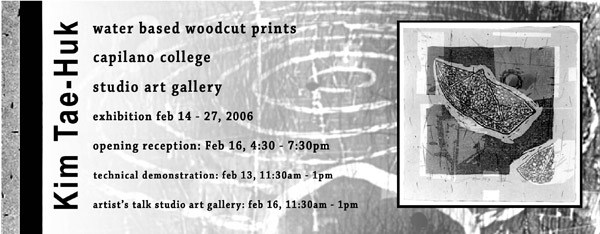
Regular readers may recall my post about our print studio’s artist-in-residence Tae-Huk Kim. Since his arrival in November, Kim has been busy making new woodcut prints using traditional Japanese water-based woodblock techniques. Next week he will be giving a demonstration of his technique followed by an exhibition of his works. Here are the details:

Monday, February 13th, 2006 11:30am – 1:00pm: Demonstration of Tools, Woodcutting and Printing

Thursday, February 16th, 2006 11:30am – 1:00pm: Walk Through Exhibition and Powerpoint Slide Show

Thursday, February 16th, 2006 4:30 – 7:30 pm: Exhibition Opening Reception

The exhibition is on from February 14th to 27th, 2006

Studio Art Gallery, Capilano College*
2055 Purcell Way, North Vancouver, BC
Gallery hours: 10am – 4pm Monday – Friday

To find your way to the North Vancouver Capilano College* campus, check out Google maps. Everyone is welcome!

* since then, the college has been designated a university

footprints

footprints.jpg

Lives of great men all remind us
We can make our lives sublime,
And, departing, leave behind us
Footprints on the sands of time.

– Henry Wadsworth Longfellow, A Psalm of Life (1838)

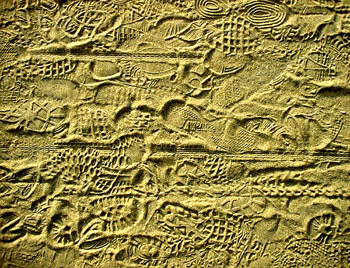
I was looking through some older photo images, and came across this one that I really like. My husband took it for me a few years ago when we were walking along a seaside park. Numerous walkers, joggers, and cyclists travelled along the path and I was captivated by their tracks on the sand. The photo above has been manipulated a bit in PhotoShop and was even more manipulated for Nexus/Sandfrieze.

Looking at this made me recall the well-known phrase “footprints in the sand” so I went to my Oxford Dictionary of Quotations and learned that it comes from Longfellow!! On the same page is another great one for artists:

Emigravit is the inscription on the tombstone where he lies;
Dead he is not, but departed, – for the artist never dies
.

(on Albrecht Dürer) – Henry Wadsworth Longfellow, Nuremberg (1844)

Strange thoughts on a Sunday morning… Gotta go make some footprints now, it’s sunny out!